
Introduction
Welcome to the Uviba - ImgEngine API! ImgEngine is one of the service of Uviba which makes your websites faster, smarter and safer. You can use our API to handle uploading, storing, processing and delivery of your images in your web and mobile apps easily. This will provide you advanced CDN, a lot of real-time manipulation features and Free Cache management. Your storage's space and development time will decrease, your website's speed will increase!
You can view code examples in the dark area to the right.
This API will help your website to improve performance and provides URL based image manipulation, so you can manipulate your images from URL. To see how our service works you can open this page, it contains our Upload Button and some Manipulation params.
Quick Start
In this section you can see quick examples. In 5 minute you will be able to use our service easily.
You can watch our video tutorials to implement documentation more easily :
1) Configuration section => Open Video in Youtube
2) Authentication section => Open Video in Youtube
3) Web Folders => Open Video in Youtube
4) Image Processing => Open Video in Youtube
5) Integration => Open Video in Youtube
6) Upload Button => Watch Tutorial on Youtube
7) Server Side Upload => Open Video in Youtube
8) Explanation for all ImgEngine Api => Open Video in Youtube
Setup
Download library and use php to include autoload.php file (in the library) to your project. To learn how to do this you can see Configuration section.
<?php
require 'path/to/Uviba_ImgEngine/autoload.php';
Auth with your secret key. Follow steps in begining of Authentication section;
You can use Web Folders which you just define url of your existing images and you will be able to manipulate them automatically without needed to upload them to our service. If you don't want to use Web Folders, you can look at Integration section.
<?php
$secret_key='Your_SECRET_KEY';
$hours=12;
$secure=true;
//you can pass params array (which can be used for web folders)
// as 4th argument to function below optionally
ImgEngine::connect($secret_key,$hours,$secure
,array('web_folder_url'=>'http://yoursite.com/path/to/images')

);
Make sure to replace Your_SECRET_KEY with your SECRET API key.
To see How to manipulate images you can look at Usage of manipulation params.
<?php

$image_name="cat.jpg"; //you can also use full url
echo '<img src="'.ImgEngine::get_image_url($image_name,
array('height'=>200,'width'=>200,'crop'=>'(123,123,123,12)')).'" />';
If you want to use our upload button you can look at Upload Button. Our upload button will help you to upload new images with rich functionality.
If you want to store new images in your server or in our service with php code, you can use our Server Side Upload.
Configuration
Use following code after installation of our library to include autoload file
<?php


$ImgEngine_API_PATH = 'Path of Uviba_ImgEngine';
/*example:
{Your local path to our library}.'/Uviba_ImgEngine/' */
//require autoload from folder you just downloaded
require $ImgEngine_API_PATH.'/autoload.php';
Make sure to replace
Path of Uviba_ImgEnginewith local path to Uviba_ImgEngine library.
Download our API from Github (or visit our Github library and just click Clone or download button and click Download zip ). After extracting zip, open it and find folder which named as Uviba_ImgEngine and copy it into your project and use path of this folder to replace Path of Uviba_ImgEngine in codes section.
The only purpose is just to include autoload.php file in Uviba_ImgEngine folder you just downloaded.
Authentication
ImgEngine uses API keys to allow access to our service. You can register a new ImgEngine API key at our developer portal. Just sign up, in the dashboard click New Project button, then choose best plan that fits you. Then back to dashboard, click Pay button (if payment failed you can use our redeem code from Payment section top of page) and click More button from the project that you want to get API key. Then scroll down and copy SECRET KEY.
Use ImgEngine::connect function in order to connect with our API it take 4 parameters:$secret_key, $hours, $secure,$params.
To authorize, use this code:
<?php


$secret_key='Your_SECRET_KEY';
$hours=12;
$secure=true;
//you can pass params array (which can be used for web folders)
// as 4th argument to function below optionally
ImgEngine::connect($secret_key,$hours,$secure);
Make sure to replace
Your_SECRET_KEYwith your SECRET API key.
Connect Parameters
| Parameter | Default | Description |
|---|---|---|
| secret_key | required | You should pass your SECRET_KEY. |
| hours | 12 | It shows how many hours are required to refresh your connect key via sending your private key with Curl request to Uviba servers to get a new connect key, so each X hours your server will refresh connect key . We are using connect key with GET param in each image request to recognize your API account. |
| secure | true | It is recommended to set it true. If it is false, everyone can manipulate your images from URL bar of the browser and it can cause increase of Uviba - ImgEngine service costs for you. If secure is true, only your server side codes can manipulate images. If someone tries to manipulate your images from URL bar of their browsers, they will get connect key is not valid response from our servers, so you are safe. To test how our API works you can set it false, so you will be able to manipulate it from URL bar. |
| params | array() | You can pass web_folder_url option to array. If you set it to link of your server folder which contains all your images, you won't need to integrate your website's images, because via that link you provide, we will find your existing images. You will pass image name and we will combine image name and web_folder_url and we will get full url so we will be able to manipulate your existing images.(E.g. http://example.com/images/. See Web Folders). |
Web Folders
Web Folders help you to use your existing images with our service without uploading them to our servers (To learn more details about integration and uploading process for your existing images see Integration section). If you set web_folder_url index to link of your server folder which contains all your existing images, you won't need to upload them to our server, because via that link you provided, we will find them . You will pass image name then we will combine $image_name with web_folder_url and we will get full URL of image itself, so we will be able to manipulate your existing images.
How to use Web folders
To activate Web folder, use this code:
<?php


$secret_key='Your_SECRET_KEY';
$hours=12;
$secure=true;


$params=array('web_folder_url'=>'http://yourdomain.com/path/to/imagefolder/');
ImgEngine::connect($secret_key,$hours,$secure,$params);
Make sure to replace
path/to/imagefolderwith image folder URL.
In ImgEngine::connect function you should pass folder's URL which contains all your images (E.g. http://example.com/images/) with params array which contains index named web_folder_url .
When you pass web_folder_url option, you don't need to upload your existing images to our service. However, when you use our Upload Button (See Upload Button section), new images that user uploaded will be saved in our server. If you don't want your images to be stored in our secure servers, you can use your own upload method to upload new images to your own server. After you provide web_folder_url index in array, you can manipulate images in that URL. When you manipulate image, $image_name will be same with web_folder_url/image_name URL.
Integration
To use our service with your existing images, you can integrate them or you can use Web Folders (See Web Folders).
To integrate your existing images, you just need to upload them to our service. To do this, we have 2 option: from UI and from server side code.
UI Integration support
Login to Dashboard. If you haven't already created a new project in dashboard click [New Project] and then choose the best plan that fits you. Click [Pay] button if you didn't. Then return back to the dashboard and click [More] button of project that you want to integrate your images with. Then Scroll down to section which is above of Keys section. You will see [Your all images] option and Open folder link in front of it. Click it to open the page which is our Cloud Storage console that called OOS(Online Operation System). Then it will automatically open a Virtual folder which contains all your images and is connected to your API KEY. Then choose all your existing images, drag and drop them to that virtual folder (in the browser), and you're done. Now you can manipulation you existing images, see Image processing for more information.
Integration with server side code
It is dead easy, you don't even need to change or save new name for each image. You just need to upload them to our service with the same name and you're done.
To do this you can create an integration file (e.g. integ.php) in your server, it will run just once and then you can delete it. In that file, select paths and names(filenames) of all your existing images. After that, for each image run upload code in some loop. To see how you can upload images with server side code you can select Server Side Upload subsection of Upload section .
Image Processing
You can manipulate images from URL if you set secure param to false in ImgEngine::connect function (see Authentication ) otherwise, it will return secure_token is not true error response. However, when you secure to true, our API will encrypt URL of the image with params that you have passed and will generate secure sign (secure_token) which will be unique for each image name and manipulation params. If someone tries to change url to manipulate image, it will return error for them because secure_token will not be true for new combination of image_name and manipulation params.
Manipulation params
You can use each function in ImgEngine::get_image_url (and similar function that you can see in code section) in php. This function will return URL which will manipulate image according to params that you have passed.This function accepts image_name and manipulation_array or string.
image_name can be file name from your server or file name from Upload Response. In addition, you can pass URL of the image which is from other website. Note: URL that you passed as an image name cannot contain GET params. See example codes in code section.
You can use following code to get image URL
<?php
$image_name="cat.jpg";
echo '<img src="'.ImgEngine::get_image_url($image_name,
array('height'=>200,'width'=>200)).'" />';

//Also, you can use simple function which will do the same job
echo '<img src="'.ImgEngine_getUrl($image_name,
array('height'=>200,'width'=>200)).'" />';

// or you can use
//code below will return img URL with img tag
echo ImgEngine::get_image_tag($image_name,array('height'=>200,'width'=>200));

//Also, you can use simple function which will do the same job

echo ImgEngine_image_tag($image_name,array('height'=>200,'width'=>200));
You can also use URL from the other website
<?php


$image_name="http://www.tpevent.com/wp-content/uploads/
2016/01/cute-cat-images-tpevent-5.jpg";
echo ImgEngine_image_tag($image_name,
array('height'=>600,
'width'=>600,
'border'=>'(10,aqua,overlay)'));
| Name | Function | Description |
|---|---|---|
| Orientation | or | Rotates the image. |
| Crop | crop | Crops the image to specific dimensions. |
| Width | w | Sets the width of the image, in pixels. |
| Height | h | Sets the height of the image, in pixels. |
| Fit | fit | Sets how the image is fitted to its target dimensions. |
| Device pixel ratio | dpr | Multiples the overall image size. |
| Brightness | bri | Adjusts the image brightness. |
| Contrast | con | Adjusts the image contrast. |
| Gamma | gam | Adjusts the image gamma. |
| Sharpen | sharp | Sharpen the image. |
| Blur | blur | Adds a blur effect to the image. |
| Pixelate | pixel | Applies a pixelation effect to the image. |
| Filter | filt | Applies a filter effect to the image. |
| Background | bg | Sets the background color of the image. |
| Border | border | Add a border to the image. |
| Quality | q | Defines the quality of the image. |
| Format | fm | Encodes the image to a specific format. |
| Zoom | zoom | allow our service to zoom image if width or height you require is more than actual image width and height. You can test it with small images to see with more details. |
ImgEngine::get_image_url,ImgEngine_getUrl,ImgEngine::get_image_tag,ImgEngine_image_tag accept the same arguments(params): $image_name,$manipulation_params.
Manipulation Params of these functions can accept either string or array types. (in string form you should separate them with comma - ,).If you are using array form, you can pass htmlWidth and htmlHeight params to get_image_tag,ImgEngine_image_tag function to set height and width of image tag.
<?php


echo ImgEngine::get_image_tag($image_name,'w_200,h_200,bri_-25,crop_(12,123,123,132)');
You can use manipulation functions (or, crop, w, h and others which was shown in chart) like this:function_value. (E.g. w_200,h_200)
For crop and border functions you should use this structure:function_(value). (E.g. crop_(123,123,123,123) )
General rule is if value part contains , or / you should put value to parenthesis.
Usage of manipulation params
Orientation or
Rotates the image. Accepts any integer but only auto, 0, 90, 180 or 270 these degrees can be use with border param. Default is auto. The auto option uses Exif data to automatically orient images correctly.
<?php

//fm stands for format
//or stands for orientation
echo ImgEngine::get_image_tag($image_name,'or_30,fm_png');

//or you can use array manipulation instead

echo ImgEngine::get_image_tag($image_name,array(
'orientation'=>90,
));
Fit fit_crop
Resizes the image to fill the width and height boundaries and crops any excess image data. The resulting image will match the width and height constraints without distorting the image.
<?php

echo ImgEngine::get_image_tag($image_name,'w_500,h_500,fit_crop');

//or you can use array manipulation instead

echo ImgEngine::get_image_tag($image_name,array(
'width'=>500,'height'=>500,
'fit'=>'crop',
));

Fit - Crop Position
You can also set where the image is cropped by adding a crop position. Accepts crop-top-left, crop-top, crop-top-right, crop-left, crop-center, crop-right, crop-bottom-left, crop-bottom or crop-bottom-right. Default is crop-center, and is the same as crop.
<?php

echo ImgEngine::get_image_tag($image_name,'w_500,h_500,fit_crop-top-right');

//or you can use array manipulation instead

echo ImgEngine::get_image_tag($image_name,array(
'width'=>500,
'height'=>500,
'fit'=>'crop-top-right',
));

Fit - Crop Focal Point
In addition to the crop position, you can be more specific about the exact crop position using a focal point. This is defined using two offset percentages: crop-x%-y%.
<?php

echo ImgEngine::get_image_tag($image_name,'w_500,h_500,fit_crop-25-25');

//or you can use array manipulation instead

echo ImgEngine::get_image_tag($image_name,array(
'width'=>500,
'height'=>500,
'fit'=>'crop-25-25',
));

Crop crop
Crops the image to specific dimensions prior to any other resize operations. Required format: width,height,x,y.
<?php

echo ImgEngine::get_image_tag($image_name,'crop_(100,100,300,300)');

//or you can use array manipulation instead

echo ImgEngine::get_image_tag($image_name,array(
'crop'=>'100,100,300,300',
));
/159988fb0bde60750108082802as123138.jpg?&connect_key=tmp619ap_k725999b80a7d7abce2c41c884f90b1723859eeab3db5577&secure_token=cbfe9e23c3f36d95578cac42eb2b1db3)
Fit - other values Sets how the image is fitted to its target dimensions.
Accepts:
contain: Default. Resizes the image to fit within the width and height boundaries without cropping, distorting or altering the aspect ratio.
max: Resizes the image to fit within the width and height boundaries without cropping, distorting or altering the aspect ratio, and will also not increase the size of the image if it is smaller than the output size.
fill: Resizes the image to fit within the width and height boundaries without cropping or distorting the image, and the remaining space is filled with the background color. The resulting image will match the constraining dimensions.
stretch: Stretches the image to fit the constraining dimensions exactly. The resulting image will fill the dimensions, and will not maintain the aspect ratio of the input image.
crop: Resizes the image to fill the width and height boundaries and crops any excess image data. The resulting image will match the width and height constraints without distorting the image. See the crop page for more information.
<?php

echo ImgEngine_image_tag($image_name,'w_200,h_500,fit_stretch');
//note:Also, you can use  array form as below
echo ImgEngine_image_tag($image_name,array(

'width'=>200,'height'=>500,'fit'=>'stretch',

));
Width and Height w,h
Sets the width and height of the image, in pixels.
<?php

echo ImgEngine::get_image_tag($image_name,'w_300,h_300');

//or you can use array manipulation instead

echo ImgEngine::get_image_tag($image_name,array(
'width'=>300,'height'=>300,
));

Device pixel ratio dpr
The device pixel ratio is used to easily convert between CSS pixels and device pixels. This makes it possible to display images at the correct pixel density on a variety of devices such as Apple devices with Retina Displays and Android devices. You must specify either a width, a height, or both for this parameter to work. The default is 1. The maximum value that can be set for dpr is 8.
<?php

echo ImgEngine::get_image_tag($image_name,'w_300,dpr_2');

//or you can use array manipulation instead

echo ImgEngine::get_image_tag($image_name,array(
'width'=>300,'dpr'=>2,
));

Brightness bri
Adjusts the image brightness. Use values between -100 and +100, where 0 represents no change.
<?php

echo ImgEngine::get_image_tag($image_name,'w_500,bri_-25');

//or you can use array manipulation instead

echo ImgEngine::get_image_tag($image_name,array(
'width'=>500,'bri'=>'-25',
));
Contrast con
Adjusts the image contrast. Use values between -100 and +100, where 0 represents no change.
<?php

echo ImgEngine::get_image_tag($image_name,'w_500,con_25');

//or you can use array manipulation instead

echo ImgEngine::get_image_tag($image_name,array(
'width'=>500,'con'=>'25',
));
Gamma gam
Adjusts the image gamma. Use values between 0.1 and 9.99.
<?php

echo ImgEngine::get_image_tag($image_name,'w_500,gam_1.5');

//or you can use array manipulation instead

echo ImgEngine::get_image_tag($image_name,array(
'width'=>500,'gam'=>'1.5',
));

Sharpen sharp
Sharpen the image. Use values between 0 and 100.
<?php

echo ImgEngine::get_image_tag($image_name,'w_500,sharp_15');

//or you can use array manipulation instead

echo ImgEngine::get_image_tag($image_name,array(
'width'=>500,'sharp'=>'15',
));

Blur blur
Adds a blur effect to the image. Use values between 0 and 100.
<?php

echo ImgEngine::get_image_tag($image_name,'w_500,blur_5');

//or you can use array manipulation instead

echo ImgEngine::get_image_tag($image_name,array(
'width'=>500,'blur'=>'5',
));

Pixelate pixel
Applies a pixelation effect to the image. Use values between 0 and 1000.
<?php

echo ImgEngine::get_image_tag($image_name,'w_500,pixel_5');

//or you can use array manipulation instead

echo ImgEngine::get_image_tag($image_name,array(
'width'=>500,'pixel'=>'5',
));

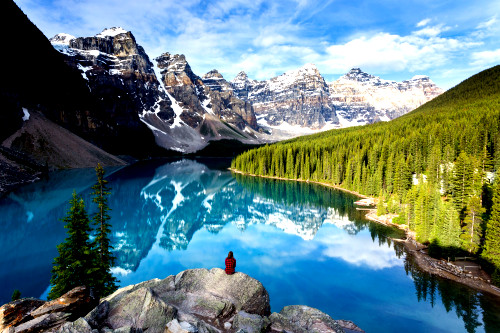
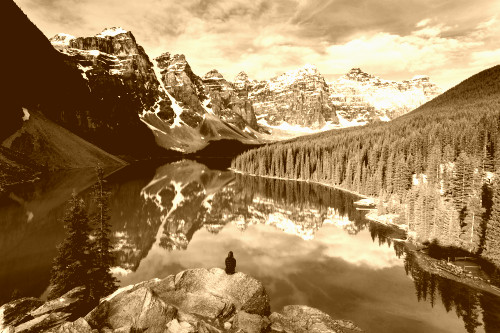
Filter filt
Applies a filter effect to the image. Accepts greyscale or sepia.
<?php

echo ImgEngine::get_image_tag($image_name,'w_500,filt_sepia');

//or you can use array manipulation instead

echo ImgEngine::get_image_tag($image_name,array(
'width'=>500,'filt'=>'sepia',
));
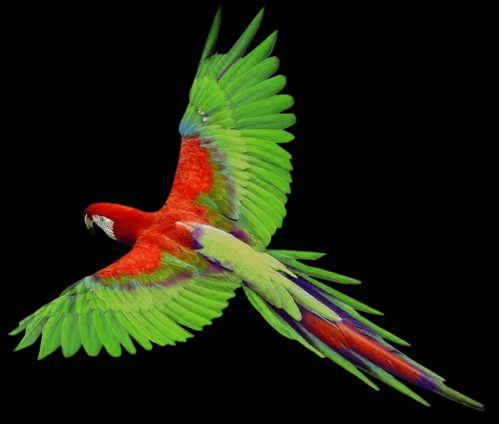
Background bg
Sets the background color of the image. See colors for more information on the available color formats.
<?php

echo ImgEngine::get_image_tag($image_name,'w_500,bg_black');

//or you can use array manipulation instead

echo ImgEngine::get_image_tag($image_name,array(
'width'=>500,'bg'=>'black',
));
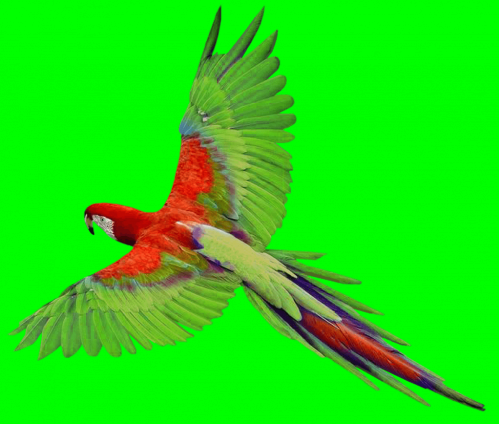
<?php

echo ImgEngine::get_image_tag($image_name,'w_500,bg_lime');

//or you can use array manipulation instead

echo ImgEngine::get_image_tag($image_name,array(
'width'=>500,'bg'=>'line',
));
Border border
Add a border to the image. Required format: width,color,method.
<?php

echo ImgEngine::get_image_tag($image_name,'w_500,border_(10,5000,overlay)');

//or you can use array manipulation instead

echo ImgEngine::get_image_tag($image_name,array(
'width'=>500,'border'=>'10,5000,overlay',
));
/159988fb0bde60750108082802as123138.jpg?&connect_key=tmp619ap_k725999b80a7d7abce2c41c884f90b1723859eeab3db5577&secure_token=cbfe9e23c3f36d95578cac42eb2b1db3)
Method
Sets how the border will be displayed. Available options:
overlay: Place border on top of image (default).
shrink: Shrink image within border (canvas does not change).
expand: Expands canvas to accommodate border.
<?php

echo ImgEngine::get_image_tag($image_name,'w_500,border_(10,FFCC33,expand)');

//or you can use array manipulation instead

echo ImgEngine::get_image_tag($image_name,array(
'width'=>500,'border'=>'10,FFCC33,expand',
));
/159988fb0bde60750108082802as123138.jpg?&connect_key=tmp619ap_k725999b80a7d7abce2c41c884f90b1723859eeab3db5577&secure_token=cbfe9e23c3f36d95578cac42eb2b1db3)
Quality q
Defines the quality of the image. Use values between 0 and 100. Defaults to 90. Only relevant if the format is set to jpg.
<?php

echo ImgEngine::get_image_tag($image_name,'w_500,q_6');

//or you can use array manipulation instead

echo ImgEngine::get_image_tag($image_name,array(
'width'=>500,'quality'=>'6',
));
Format fm
Encodes the image to a specific format. Accepts jpg, pjpg (progressive jpeg), png or gif. Defaults to jpg.
<?php

echo ImgEngine::get_image_tag($image_name,'w_500,fm_png');

//or you can use array manipulation instead

echo ImgEngine::get_image_tag($image_name,array(
'width'=>500,'fm'=>'png',
));

Responsive Images
You can use dprparam to get responsive images for each device by using srcset attribute of img tag.
<img
  srcset="/dpr_1/asset.png 1x, /dpr_2/asset-2x.png 2x, /dpr_3/asset-3x.png 3x"
  src="asset.png"
>
lets use dpr <br/>

<img
  srcset="<?php echo ImgEngine::get_image_url($image_name,'w_500,dpr_1'); ?> 1x,
<?php echo ImgEngine::get_image_url($image_name,'w_500,dpr_2'); ?> 2x,
<?php echo ImgEngine::get_image_url($image_name,'w_500,dpr_3'); ?> 3x"
  src="<?php echo ImgEngine::get_image_url($image_name,'w_500'); ?>"
>

Upload
There are 2 ways to upload images to our service: UI and Server side code.
Upload Button
We are providing Upload Button with rich functionalities which support drag and drop upload (link, image tag, image from user's operation system) and uploading multiple files.
You can create our upload button with php or html.
After you create upload button, you should call ImgEngine::get_uploader_scripts php function which will load our javascript library to activate the button. After activation, your input will be converted to div which will be actual upload button with all functionalities. Upload Button means the button that our javascript library created.
You can use attributes chart below to create Upload button with html or php. If you use php, you should pass them as an array. If you use html, you should define them as an html attribute in the input tag.
You can customize Upload Button and Drag Area with attributes of the input you just created.
Drag Area is area which will appear when user drags some items on the browser.
To create upload button with php you can use following code:
<?php

//below is an array of attributes for the input which will accept files.
$button_input_attr=array("uviba-uploader-id"=>"myUploadId");
echo ImgEngine::create_upload_button($button_input_attr);
//after you create button in order to activate it use code below
ImgEngine::get_uploader_scripts();
To create upload button with html you can use following code:
<!---There should be a container div-->
<div>
<!---class attr should contain uviba-oos-image-uploader-->
<input
uviba-uploader-id="myUploadId"
class="uviba-oos-image-uploader"
type="file" name="file" accept="image/*"
multiple="true" buttonText="Upload Photos"
buttonStyle="" buttonAttr="" buttonClass="" dragAreaStyle=""
DragAreaAttr="" dragAreaClass=""  />

</div>
<?php

//after you create button in order to activate it use below code
ImgEngine::get_uploader_scripts();
Each attr has a meaning, you can read about each of them.
Meaning of each input attributes
| Attribute | Accepts | Description |
|---|---|---|
| uviba-uploader-id | unique string for each button | if you have multiple upload buttons, it will help you and our library identify buttons. For example, uviba_OOS_uploader.get_uploaded_file_names('string that you have passed to uviba-uploader-id');, this function will return current uploaded file names related with the id that passes to its paramater. |
| buttonText | string | text of upload button. Default is Choose Photos. |
| multiple | true or false | if it is true, upload button can accept more than one file at the same time otherwise, only one. |
| image-uploader-count-limit | number | maximum how many files Upload Button can accept at the same time. |
| buttonStyle | css string | Upload Button style attribute. E.g. color:blue;padding:20px;background:white; |
| buttonAttr | string | Custom attr of Upload Button. E.g. mycustomerAttr=true exampleattr="example value" |
| buttonClass | string | add new custom classes to Upload Button |
| dragAreaStyle | css string | Drag Area style attribute. To see examples please look at buttonStyle above. |
| dragAreaAttr | string | Custom attrs for Drag Area. To see examples please look at buttonAttr above. |
| dragClass | string | add new custom classes to Drag Area |
Usage of Upload Button
We have created a javascript library for you which was automatically loaded when you call ImgEngine::get_uploader_scripts(); function. You can use uviba_OOS_uploader class to control Upload Button behaviors and requests that it sent.
When user chooses images or drag and drop them to Upload Button, user's browser will send those images to our servers. Then our servers will return response which contains file_name , mime_type, file_src and other useful information for you. You can check all response indexes in Upload Response section.
<script>
uviba_OOS_uploader.setUploadUrl('http://www.example.com/upload.php');

</script>
in upload.php use below code:
<?php

$upload_path="path_to/images/";
$result = Imgengine::download_auto($upload_path);
echo json_encode($result);
How to Upload Image to your own server
You can use uviba_OOS_uploader.setUploadUrl function to upload files to custom url.
It accepts 1 param which is upload url. For example, uviba_OOS_uploader.setUploadUrl(http://example.com/upload.php). It will send files with $_FILES['file'] variable.
To try this, you can create upload.php file and pass its url to uviba_OOS_uploader.setUploadUrl function. Then you should use Imgengine::download_auto($upload_path,$filename) function to complete upload process, it will move file to $upload_path that you defined, and will return necessary params with array. You should use echo json_encode($result_from_func); to return response in upload.php file.
To manipulate new uploaded image URL you can use this code:
<script type="text/javascript" >

uviba_OOS_uploader.set_response_url_params({

'width':200,'height':200,'border':'(10,5000,overlay)',

});

</script>
How to get and manipulate new Uploaded Image Url
uviba_OOS_uploader.set_response_url_params will set manipulation params for file_src which will come with response and will represent URL for the uploaded image .(click to learn more)
How to control upload process
We are providing callback for each step in uploading process so you will be able to customize all processes easily.
In javascript you can use functions of uviba_OOS_uploader javascript class.
Meaning of params that will be used in chart:
element is the container of upload button (in html code it is div that contains Upload Button)
upload_count - how many images the user has chosen
index - index of new chosen image (for example, index of second uploaded image will be 2)
percentComplete - what percentage of process finished for uploading an image
event - come from xhr.upload.addEventListener("progress",function(event)). (If you will not use it or you didn't know what it is, you can ignore this part).
data - is response data from our server, you can see it in Upload Response section
Following code is default behavior code to control uploading and you can also customize it:
//will be called after user selects image that he or she wants to upload
uviba_OOS_uploader.when_select(function(element,upload_count){
    //inside is just example you can customize it
uviba_OOS_uploader.when_select_default(element,upload_count);
//your custom codes
});

//will be called before each upload process begin for each image
uviba_OOS_uploader.when_upload_begin(function(element,index,upload_count){
    uviba_OOS_uploader.when_upload_begin_default(element,index,upload_count);
//your custom codes
});

//will be called each time upload progress is finished
//so you can show how many percent of image uploaded
uviba_OOS_uploader.when_upload_progress(function(e,percentComplete,element,index){
    uviba_OOS_uploader.when_upload_progress_deault(e,percentComplete,element,index);
//your custom codes
});

//will fire after upload is finished  successfully when code is 200
uviba_OOS_uploader.when_upload_finish(function(data,element,index){
    //you need to check if data contains error index or not
    try{
        var json = JSON.parse(data);
    }catch(e){
        return false;
    }
uviba_OOS_uploader.when_upload_finish_default(data,element,index);
//your custom codes

});


//will fire when upload is failed
uviba_OOS_uploader.when_upload_fail(function(element,index){
    //when upload response code is not 200
uviba_OOS_uploader.when_upload_fail_default(element,index);
//your custom codes

});
| Function | passed params | Description |
|---|---|---|
| when_select | element ,upload_count | This will be called when user selects or drag and drops images. |
| when_upload_begin | element, index , upload_count | it will be called for each image that begins to be uploaded. |
| when_upload_progress | event, percentComplete, element, index | it will be called for each image in each process completed. You can use this function to get how many percentages of image uploaded, and you can create your custom progress bar. |
| when_upload_finish | data,element,index | it will be called when uploading process is finished |
| when_upload_fail | element,index | it will be called when upload failed and response code is not 200. |
| get_uploaded_file_names | uviba-uploader-id | This function will return all uploaded file names related with uviba-uploader-id, you can see it in the chart which is on top of Upload Button section. |
If you didn't set callback functions chart above, default functions will work instead of them: when_select_default,when_upload_begin_default,
when_upload_progress_default,when_upload_finish_default,when_upload_fail_default.
If you want to customize uploading process, but also want to use default behaviors, you should call default functions and pass arguments(params) to them.
Server Side Upload
First you should finish Configuration section and Authentication section then create a new file (can be named like upload.php) and include config and auth codes to continue.
There are 2 ways to store images: in your server (Imgengine::download) (Recommended if you use Web Folders), in our service (Imgengine::upload)
How to store images in your own server
To download an image use this code:
<?php

$file = 'Local path, URL or data Uri of Image';
//filename should contains extension!!
$filename = ImgEngine::download($file,'/path_to/images/');
//filename is not false it means download was successful
You can use Imgengine::download function from our API library to download new images to your server,so it will be stored in your own server (Recommended if you are using Web Folders).
Imgengine::download takes 3 params: String file, String upload_path, String newFilename
| Parameter | Default | Description |
|---|---|---|
| file | required | You should pass path, URL or data uri of image.E.g. this parameter can be one of these:/home/cat.jpg, http://www.example.com/image.jpg, data:image/jpg;base64,RASDHKLSJDHKLASHDKLJASHDSexample. Also you can pass $_FILES['fileToUpload']['tmp_name'] as a file path. |
| upload_path | required | In which path images will be stored. E.g /path_to/images/ |
| newFilename | unique name | If you don't pass this param, it will be generated automatically. This is a name for downloaded image. |
Imgengine::download will return filename if it is not false it means download was successful.
How to upload images to our service
To upload an image use this code:
<?php

$file = 'Local path, URL or data Uri of Image';
//filename should contains extension!!
$data = ImgEngine::upload($file,array('filename'=>'Yourfilename.jpg'));
//you can check upload is successful or not
To check errors use this code:
<?php
if($data!==false){
//response is JSON
    if($data['error']==false){
    //upload was successful
    //you can save image name , to get the image name use the following code
    $new_image_name = $data['file_name'];
       echo "Upload was successfull, response is <br/>";
       var_dump($data);
    }else{
      //upload was failed
    //To get error you can use below code
    echo 'Error Message:'.$data['error_mes'].'<br/>
          Error Code:'.$data['error_code'];
    }
}else{

//upload was failed, response is not JSON
//below function will return last reponse from `Curl` request
 var_dump(ImgEngine::getLastResponse());

}
You can use Imgengine::upload function from our API library to upload new images to your imgengine, it will be stored in our service.
Imgengine::upload takes 2 params: String file, array params
| Parameter | Default | Description |
|---|---|---|
| file | required | You should pass path, URL or data uri of image.E.g. this parameter can be one of these:/home/cat.jpg, http://www.example.com/image.jpg, data:image/jpg;base64,RASDHKLSJDHKLASHDKLJASHDSexample. |
| params | array() | you can pass the image name with array params.array('filename'=>'image_name'). If you don't pass filename, it will be generated automatically. Note: Never store filename that you passed, store filename that in the response of Imgengine::upload function because name that you passes can be duplicate, in that case our smart ai will add version to filename. E.g yourfilename(1). |
You can use this code to upload images from your users and also integrate your existing images with our service. (If you use Web Folders, you don't need to do it)
If response equals to false, it means upload process is failed, otherwise upload process was successful. You can learn more information in Upload Response section.
Upload Response
filename is image_name, so you can save it in database after you get response.
Success Response
If upload was successfull it will return a multidimensional array form of following JSON response.
{
"error":false,
"file_name":"filename of image",
"size":6000,
"file_extension":"jpg",
"mime_type":"image/jpeg",
"image_dimensions":{
    "height":1000,
    "width":1000,
        }
"file_src":"full URL of image, so you can use it in image tag as src",

}
Below is response from our servers for successfully uploaded images.
| Index | type | Description |
|---|---|---|
| file_name | string | If you didn't spesified filename in server side upload, it will be automatically generated and it will return filename with this index. If filename is not unique, our service will add version to the end of the filename. E.g. Yourfilename.jpg(1). If you upload file with our Upload Button, file name always will be generated. |
| size | int | size of image with bytes |
| file_extension | string | with which extension file was uploaded.Note:if uploaded image name doesn't contain an extension, it can return filename |
| mime_type | string | mime type of file that uploaded. For example, "image/jpeg" |
| image_dimensions | array | array will contain 2 params:height and width of the image. |
| file_src | string | you can use this in html image tag as src attribute. If you are using our UI Upload Button (with Javascript), you need to know that set_response_url_params function will affect this response index, so it will return manipulated form of the image that you required in that function. |
Error Response
{
"error":true,
"error_code":2,
"error_mes":"It is not actual image",

}
| Index | type | Description |
|---|---|---|
| error | boolean | This will be true in error response. |
| error_code | int | You can see the meaning of errors in Error codes . |
| error_mes | int | give a message which describes error. |
Errors
Error codes
| Error Code | Meaning |
|---|---|
| 1 | User used drag and drop method to upload an image and dropped the text which is not a link. |
| 2 | User didn't upload actual image. |
| 3 | File that user uploaded cannot be moved. The reason might be user wanted to upload malicious script and our system security prevented it. |
Errors for image processing
| Error Code | Meaning |
|---|---|
| secure token is not true | secure token is GET param which was generated from combination of your API SECRET KEY and manipulations params. Secure token only will be required when you set secure parameter to true in ImgEngine::connect method (See Authentication). This error happens when user tries to manipulate image from URL bar in secure mode. |
| connect_key is not valid | connect_key is GET param which was generated by response each x hour that you defined in ImgEngine::connect method (See Authentication).This method sends request to our server in each X hour that you defined and our server will generate connect_key which will be valid for X hour. This error can happen when someone changes your connect_key from URL bar or use old one. Note if you have sub domain you should include our library instead of duplicate it. When you duplicate our library you can get this error. If you got this error, you should include our library from one point, then you should clear inside of key.txt in our library which is located at ResizzerAPI/storage/key.txt. |
| Could not find image | Our server couldn't find image that you requested in our server and in your server (if you defined web_folder_url Web folders ). |
Colors
Resizzer supports a variety of color formats. In addition to the 140 color names (listed below) supported by all modern browsers, Resizzer accepts hexadecimal RGB and RBG alpha formats.
Hexadecimal
3 digit RGB: CCC
4 digit ARGB (alpha): 5CCC
6 digit RGB: CCCCCC
8 digit ARGB (alpha): 55CCCCCC
Color names
aliceblue
antiquewhite
aqua
aquamarine
azure
beige
bisque
black
blanchedalmond
blue
blueviolet
brown
burlywood
cadetblue
chartreuse
chocolate
coral
cornflowerblue
cornsilk
crimson
cyan
darkblue
darkcyan
darkgoldenrod
darkgray
darkgreen
darkkhaki
darkmagenta
darkolivegreen
darkorange
darkorchid
darkred
darksalmon
darkseagreen
darkslateblue
darkslategray
darkturquoise
darkviolet
deeppink
deepskyblue
dimgray
dodgerblue
firebrick
floralwhite
forestgreen
fuchsia
gainsboro
ghostwhite
gold
goldenrod
gray
green
greenyellow
honeydew
hotpink
indianred
indigo
ivory
khaki
lavender
lavenderblush
lawngreen
lemonchiffon
lightblue
lightcoral
lightcyan
lightgoldenrodyellow
lightgray
lightgreen
lightpink
lightsalmon
lightseagreen
lightskyblue
lightslategray
lightsteelblue
lightyellow
lime
limegreen
linen
magenta
maroon
mediumaquamarine
mediumblue
mediumorchid
mediumpurple
mediumseagreen
mediumslateblue
mediumspringgreen
mediumturquoise
mediumvioletred
midnightblue
mintcream
mistyrose
moccasin
navajowhite
navy
oldlace
olive
olivedrab
orange
orangered
orchid
palegoldenrod
palegreen
paleturquoise
palevioletred
papayawhip
peachpuff
peru
pink
plum
powderblue
purple
rebeccapurple
red
rosybrown
royalblue
saddlebrown
salmon
sandybrown
seagreen
seashell
sienna
silver
skyblue
slateblue
slategray
snow
springgreen
steelblue
tan
teal
thistle
tomato
turquoise
violet
wheat
white
whitesmoke
yellow
yellowgreen
Examples
To see examples you can look at Quick Start section. To see How to manipulate images you can look at Usage of manipulation params.